Kate
Novice
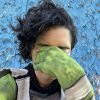
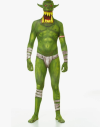
Hi! A couple of people asked me how I do makeup for my orc, so I decided to make a forum post for posterity. This guide is meant for complete beginners, and can be generalized to anything else that involves a full face of makeup. I will try to add as much information as I know from a good chunk of time cosplaying and doing theatre, thus there will be a lot of asides and disclaimers. Ignore my neck in the below reference photo, I've gotten better over the couple of years since that was taken, and I totally for sure know exactly what I'm doing (lie). Off we go!
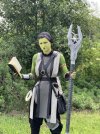
STEP ONE: Regret being awake this early when you were RPing too late into the night.
- Be prepared for this when you play a character with involved costuming requirements.
STEP TWO: Clean your face and moisturize!
- If your face isn't cleaned and moisturized , skin can flake off and start to peel during the application process. It'll look bad.
- WHEN you moisturize, make sure the moisturizer fully dries on your face before applying makeup. Invest in a hand fan or something, or give it a few minutes. Otherwise, paint and moisturizer mixed together don't play well.
- I usually just do a quick swab with a makeup remover wipe and use a readily available moisturizer.
STEP THREE: Prep your instruments.
Alright, this is where things start to get complicated. Firstly, I'll tell you what I do. Secondly, I'll add tangents on other options and techniques.
- Get some kind of mirror, I find front facing phone cameras don't do the trick.
- I use water activated makeup from a brand named Snazaroo.
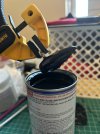
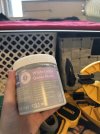
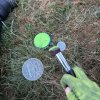
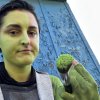
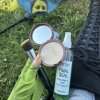
- Most water activated makeup comes in a form similar to the one below, and must be mixed with a couple of drops of water, that must be rubbed into the paint.
- I do mean a couple of drops. Half the size of a penny. If you over-water, it'll go from painting with acrylics to painting with watercolors. Your coverage will be poor, and the paint will be diluted. You can always add more water if it starts to dry out. This is the most common mistake I've seen with water based paints.
- I apply with a brush after mixing the water in, with brushing and dabbing motions. This part sometimes needs a bit of practice, so don't be worried if your first couple of jobs are a bit streaky or patchy until you lock in on your needed water amount and application.
- Be careful if you're trying to do multiple layers. The water in the paint you're applying reactivates the paint thats (hopefully) dried on your skin, and can get very patchy. Aim for a solid single layer with maybe some small dabs of correction. If you aren't getting a thick enough layer, you need to dry the paint.
Other thoughts:
- Some prefer grease paint to water-based paint. I've heard it holds up better if you're a rather sweaty individual, though have no first-hand experience with it. Be warned that it is heavier to wear, and can stain clothing more easily than water-based, which washes out easily.
- Brush application is not the only way to go! A lot of people use disposable sponges to apply the paint, which works just as well. I simply prefer the brush.
- There are many brands out there of water-based paint. Ben Nye and Mehron are two that have been highly recommended to me.
STEP FOUR (Optional): Be extra.
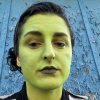
So. Right here you could call it, seal your paint, and go defeat forces of evil. You're Alliance rules legal. BUT...... what if we added a little extra? I like to get rid of the pinkness and try to be as green as I can get. Here's what I like to do:
-Add some dark eyeliner to my waterline to get rid of the pink lid.
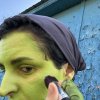
- Take an eyeshadow pallette than is complimentary to the skin tone (I chose brown after years of green, I think it looks better) and apply it to your cheekbones, along the jawbone, in the eye socket, on the sides of the nose with a fluffy brush..... contouring stuff. If you don't know what that is, look up diagrams for contouring and you'll get the picture. I ain't no countourologist. All we're doing is adding depth to your face that you have with your normal skin so you look more real.
- Put on lipstick! Yeah, I know some of you may be grumbling, but just face paint on your lips wears off Very Fast. Lipstick is formulated for your lips, and it'll stay much much longer.
STEP FIVE
(Optional): Be MORE extra.
My orc is old. I add white paint to her hair and use a fine-ish brush to add dark powder to the natural lines on my face to deepen them. If you're pondering adding scars, tattoos, war paint, etc., do it. I double dog dare you.
STEP SIX (NOT OPTIONAL PLEASE LISTEN AND DO THIS): SEAL YOUR PAINT
Ok, these are the big guns. LARP is a sport. We're out here during hot summers, doing physical activity, etc. etc. Face paint melts off. Quickly. Here's how we avoid becoming a goopy mess.
- I swear by a combination of setting powder and setting spray. Ben Nye's Final Seal or other similar threatre grade makeup sealing sprays will be your friend here. As for the powder, not gonna lie, just a simple compact of translucent powder you can get at a drug store will do. You can get powder and spray that are marketed to be used together, but I'll be honest. I haven't noticed a difference between Ben Nye's setting powder vs baby powder vs some generic powder.
- Once your makeup is dry, lightly dab on powder. Then spray all of your painted surfaces. Let dry. Then add another layer of power. This is alright for many circumstances, though if the day is particularly hot or I'm expecting a lot of running, I do another layer of spray and another layer of power.
- All high makeup people should invest in a hand fan. Sealant can only hold back so much. Try and get cool or aggressively fan yourself before you melt.
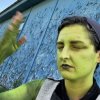
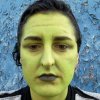
Hey, you've done it! I kinda forgot to take an all-done picture at 9:30am that morning with my tusks in. However, I DID get a picture at 2:30am, 17 hours of LARPing later:
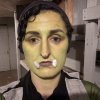
We did ok! Loooong day of fighting and talking, but I'm still green!
Aside: getting it off.
Makeup wipes are the easiest way. Cold cream helps with lingering staining I am told. Micellar water on makeup pads is good too. It takes me a few rounds of scrubbing to get it all off, and then a couple of showers to get the jaundiced look gone. This varies based on what product you use and what your skin is like.
I hope this tutorial helped someone. I am limited to number of photo uploads, but I have more to say. Below, I am going to post my method for making tusks, which is different than the usual method. Below that, general kit tips for quality of life. After that, I would very happily welcome all questions, or tips/experiences from my fellow high makeup people!

STEP ONE: Regret being awake this early when you were RPing too late into the night.
- Be prepared for this when you play a character with involved costuming requirements.
STEP TWO: Clean your face and moisturize!
- If your face isn't cleaned and moisturized , skin can flake off and start to peel during the application process. It'll look bad.
- WHEN you moisturize, make sure the moisturizer fully dries on your face before applying makeup. Invest in a hand fan or something, or give it a few minutes. Otherwise, paint and moisturizer mixed together don't play well.
- I usually just do a quick swab with a makeup remover wipe and use a readily available moisturizer.
STEP THREE: Prep your instruments.
Alright, this is where things start to get complicated. Firstly, I'll tell you what I do. Secondly, I'll add tangents on other options and techniques.
- Get some kind of mirror, I find front facing phone cameras don't do the trick.
- I use water activated makeup from a brand named Snazaroo.
- Most water activated makeup comes in a form similar to the one below, and must be mixed with a couple of drops of water, that must be rubbed into the paint.
- I do mean a couple of drops. Half the size of a penny. If you over-water, it'll go from painting with acrylics to painting with watercolors. Your coverage will be poor, and the paint will be diluted. You can always add more water if it starts to dry out. This is the most common mistake I've seen with water based paints.
- I apply with a brush after mixing the water in, with brushing and dabbing motions. This part sometimes needs a bit of practice, so don't be worried if your first couple of jobs are a bit streaky or patchy until you lock in on your needed water amount and application.
- Be careful if you're trying to do multiple layers. The water in the paint you're applying reactivates the paint thats (hopefully) dried on your skin, and can get very patchy. Aim for a solid single layer with maybe some small dabs of correction. If you aren't getting a thick enough layer, you need to dry the paint.


Other thoughts:
- Some prefer grease paint to water-based paint. I've heard it holds up better if you're a rather sweaty individual, though have no first-hand experience with it. Be warned that it is heavier to wear, and can stain clothing more easily than water-based, which washes out easily.
- Brush application is not the only way to go! A lot of people use disposable sponges to apply the paint, which works just as well. I simply prefer the brush.
- There are many brands out there of water-based paint. Ben Nye and Mehron are two that have been highly recommended to me.
STEP FOUR (Optional): Be extra.
So. Right here you could call it, seal your paint, and go defeat forces of evil. You're Alliance rules legal. BUT...... what if we added a little extra? I like to get rid of the pinkness and try to be as green as I can get. Here's what I like to do:
-Add some dark eyeliner to my waterline to get rid of the pink lid.
- Take an eyeshadow pallette than is complimentary to the skin tone (I chose brown after years of green, I think it looks better) and apply it to your cheekbones, along the jawbone, in the eye socket, on the sides of the nose with a fluffy brush..... contouring stuff. If you don't know what that is, look up diagrams for contouring and you'll get the picture. I ain't no countourologist. All we're doing is adding depth to your face that you have with your normal skin so you look more real.
- Put on lipstick! Yeah, I know some of you may be grumbling, but just face paint on your lips wears off Very Fast. Lipstick is formulated for your lips, and it'll stay much much longer.


STEP FIVE
(Optional): Be MORE extra.
My orc is old. I add white paint to her hair and use a fine-ish brush to add dark powder to the natural lines on my face to deepen them. If you're pondering adding scars, tattoos, war paint, etc., do it. I double dog dare you.

STEP SIX (NOT OPTIONAL PLEASE LISTEN AND DO THIS): SEAL YOUR PAINT
Ok, these are the big guns. LARP is a sport. We're out here during hot summers, doing physical activity, etc. etc. Face paint melts off. Quickly. Here's how we avoid becoming a goopy mess.
- I swear by a combination of setting powder and setting spray. Ben Nye's Final Seal or other similar threatre grade makeup sealing sprays will be your friend here. As for the powder, not gonna lie, just a simple compact of translucent powder you can get at a drug store will do. You can get powder and spray that are marketed to be used together, but I'll be honest. I haven't noticed a difference between Ben Nye's setting powder vs baby powder vs some generic powder.
- Once your makeup is dry, lightly dab on powder. Then spray all of your painted surfaces. Let dry. Then add another layer of power. This is alright for many circumstances, though if the day is particularly hot or I'm expecting a lot of running, I do another layer of spray and another layer of power.
- All high makeup people should invest in a hand fan. Sealant can only hold back so much. Try and get cool or aggressively fan yourself before you melt.


Hey, you've done it! I kinda forgot to take an all-done picture at 9:30am that morning with my tusks in. However, I DID get a picture at 2:30am, 17 hours of LARPing later:

We did ok! Loooong day of fighting and talking, but I'm still green!
Aside: getting it off.
Makeup wipes are the easiest way. Cold cream helps with lingering staining I am told. Micellar water on makeup pads is good too. It takes me a few rounds of scrubbing to get it all off, and then a couple of showers to get the jaundiced look gone. This varies based on what product you use and what your skin is like.
I hope this tutorial helped someone. I am limited to number of photo uploads, but I have more to say. Below, I am going to post my method for making tusks, which is different than the usual method. Below that, general kit tips for quality of life. After that, I would very happily welcome all questions, or tips/experiences from my fellow high makeup people!
Last edited:

