An inquiring mind....

E.E.

Newbie
Alright, I only have the experience of a single 3 day event so, I'm filled with questions. Alas, I only have a few that I cannot find myself or figure out.

1st. What is the max length of a one handed sword?

2nd. I need a shield. Something of a Viking design. I have the design but, I need materials. What should I create it out of?

3rd. Where is a good place to buy fur...things...I need bracers, a vest, and leggings. It doesn't have to be real fur. I'm hoping for a cheap fake version or homebrew. It wont affect points per area will it? I also need a headdress that's of a wolf or bear or something. Could I guy a stuffed animal?:p

4th. How can I make a sword that's....Like this:

/|
| |
| |
| |
| |
| |
| |
====
||
||
||

Where it's thicker on two sides, ya know?

Again, I'm a newb. All of this is for my PC. I'm really excited for what it's going to be like.
 
Most of your questions are answered in the rulebook. If you can't get a physical book, you can get the PDF version here.

1: A maximum length Long Sword is 44" long. There are many, many other length/padding/component requirements then just that. Check your rulebook for the other specifications.
2: Shields can be made of many different things, depending on your need for aesthetics/price/weight. I personally make cloth-covered ultralight shields from rigid foam insulation. The amount of time/money/effort that you're able to put into a shield will determine a lot of its functionality/looks. Once again, there are many requirements on building a shield, see your rulebook for details.
3: You can get fake fur at fabric or craft stores like Joanne's Fabrics or Michael's. The armor won't be affected by the fake-ness of the fur, because you'll receive no armor points for it anyways (unless it's real fur and backed by some amount of actual leather). I recommend not looking like you skinned a muppet though and getting some help from someone with some sewing experience. There's a player in the Seattle chapter that uses a wolf mask as a headdress, which works out pretty well. Halloween is coming up, you may be in luck there.
4: You can make that type of sword by adding a little more foam to the edges when you make your sword. Remember that all of the weapon is still required to meet the minimum padding thickness, even if it's not on the 'striking surface' of your weapon. Since the foam is extra, it could be either open or closed cell foam, but you'll generally find that the closed will stand up to wear better and your weapon wont be confused for a blunt if you do it badly. Generally, its a better idea not to make your sword look like that, but I've never seen anyone take my word for it, so learn by experience.

I highly recommend following the step by step directions in the book and making a Long Sword as your first weapon attempt and not embellishing it with any extra bits. It's much easier to learn what you did wrong and fix it if there's not a bunch of extra stuff you'll have to take off of the weapon to do it. Keep in mind that nearly everyone's first weapon fails safety check, so be prepared to fix/remake parts (or all) of your weapon at the first game you bring it to. If you're lucky and the marshal checking your weapon has the time, you may even be able to get some help/pointers for when you have to fix it.

~Matt, WCV
Marshal
 
Thanks. I would've bought a rulebook the other day but, my wallet was lost. I'm STILL missing it.
Internet copy = No credit card.

Ah, I get the fur thing. See, I'm trying to make a Vikingesk PC. I want to be as legit as I can with the armor. I believe they wore fur but, I could be wrong.

With the shield I found that I could make it out of cardboard by making it out of 4-5 layers or something. Perhaps I shall inquire the marketplace.
 
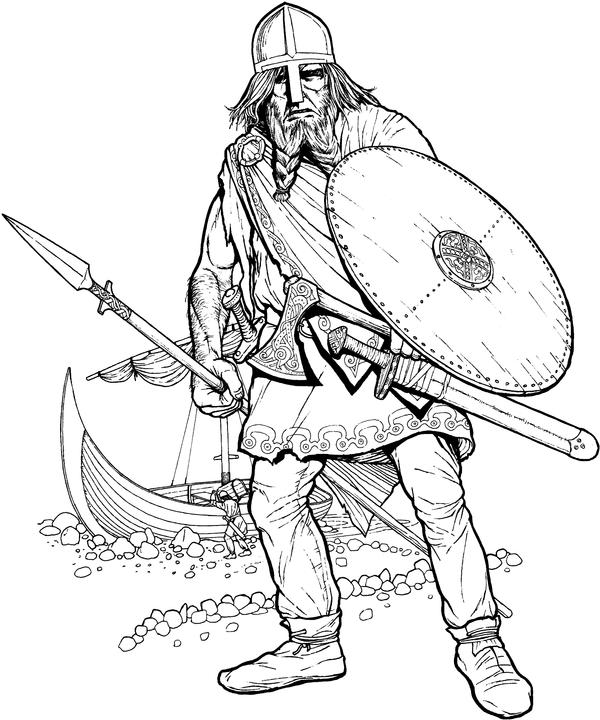
Which conception of a Viking are you going for? The stereotypical fantasy-barbarian type as so :

viking.jpg


or the more roughly historical concept, like so:

Viking.jpg


If the first, I'd suggest not using viking as the term. It can get people... tetchy. :) As far as something barbarian-looking, if your sewing isn't up to snuff, you could always go with the fur tabard method. It's really simple. Grab a length of long-furred faux fur fabric. Cut off enough for twice the distance from mid-thigh to your neck, plus six inches. If the bottom edges are a little ragged, even better. Keep enough out to do bracers and boot covers if you like. Fold it in half, fur side in, and cut out a neck hole. Toss it over your head, belt it at the waist, and viola, shaggy tunic.


If you're going for the second type, costuming is going to be pretty simple assuming you can sew. Early period clothing isn't complex, and a T-tunic and wrap pants will do the job nicely.
 
Actually the vikings were known for their chain armor but fur works great and looks great IMO.

The cardboard & glue shield works wonders and it is the one I prefer. You can also easily paint on it :) Some people think that it is too delicate but truthfully if someone swings hard enough to bend your cardboard shield, they're swinging too hard.
 
If you make a shield out of cardboard:
*Alternate the direction the corrugation is pointing with each layer. Make one perpendicular to the previous one, then thrown in a diagonal and a layer perpendicular to that one. It should be pretty strong at that point.
*Make sure you coat it in some kind of sealant, otherwise it will disintegrate in the rain. Painting the shield helps, especially if you're using acrylics.
 
I'm doing a more historical type. I mainly now, after some thought, have only the headdress and upper body to think of. For the lower body this is what I'm going to do.

Go to goodwill and buy some kind of crappy white pants. Pockets or not. Wear my boots.(Do combat boots work?) Buy shin/knee guards from target or, if they have some, goodwill.

As for the shield/sword I am going to attempt at making one. As long as it's not all floppy and it goes with specs it SHOULD work, correct?(Sword wise.) The shield is going to be a cardboard one. Cheap, easy, and it's pretty strong. And yes, if they break it, they're swinging WAAAY too hard. At MOST I should only have dents. And that's after a lot of battles.(Perhaps dubble foaming the middle?)
 
With a camping foam face and the pipe foam around the edge, they'd have to do some SERIOUS work to damage the shield. The only thing that I've had bend my shield was when someone fell onto it while it was propped against a wall.
 
markusdark said:
With a camping foam face and the pipe foam around the edge, they'd have to do some SERIOUS work to damage the shield. The only thing that I've had bend my shield was when someone fell onto it while it was propped against a wall.
I'm doing that. Someone linked me to a youtube video of making one out of cardboard. They say use 4 layers but, I dunno. I may use more. Depends. (is there a max thickness?)
 
Per the rules, I'm not aware of one. Practically, I don't make them more than 1.5" thick myself, since that way I can edge them with half-cut pipe foam without having to splice any more in.
 
another light and strong method of shield building is the pink foam insulation, with a layer of cardboard glued to either side. 1" thick variety works well, if you want beefier, get thicker pink foam. 1 1/2" is strong, but finding the closed cell pipe foam to go around the 2" is a bit rougher.

It is a bit lighter than the all cardboard, just as strong, and takes less time to build.
 
The rigid pink foam breaks. By laminating cardboard (better is the plastic looking cardboard) you prevent it bending and breaking.

I have had fairly good success (3-5 years of NPC use) out of plain rigid pink foam coated in duct tape. BUT, the caveat to that is that the same results with cardboard but you can paint it easier and do more with it.
 
The rigid pink foam breaks if you store it/pack it wrong (or use the wrong type/thickness). I've had the same foam shield for about 7 years, and it's taken my full weight +gear jumping onto it into gravel. I once used it as a toboggan. I cloth cover all of my gear to reduce weight/improve lifetime/aesthetics, and that takes paint fine. There's a lot of things you can do to a cloth-covered shield (regardless of internal structure) that you can't do with a duct tape covered one. I've got pouches, straps, potions, and alchemy packets all integrated into the back side of my cloth covered shields. You can see a few here.
 
I pretty much just need a simple circle shield. I'm going to paint it rather dull anyway.

How did you build yours exactly, Obcidian?
 
I use a 2" thick piece of rigid foam and cut the shape so that it'll be 2" smaller on all sides then I want the final product. If you're going to make a round shield, attach a pencil to a sharpie with a length of string that is 2" shorter then the radius you want. Poke the pencil into the foam in the center of where you want to cut the blank from and use the sharpie to draw a circle (you're basically making a giant compass with your pencil/string/sharpie system). Laying the foam flat, cut out the piece with a steak knife (you'll get lots of tiny pink foam pieces everywhere, be prepared to vacuum) using up and down strokes, keeping the knife perpendicular to the ground. Figure out where you want your grip and arm bit, keeping in mind that you'll increase the diameter by the time you're done. Mark where you'll want the straps with a sharpie, then cut slots there. Cut them wide and thick enough that you can pass a belt/leather strap/whatever you want to use as straps through the holes. Split most of a piece of pipe foam in half (part of the split should already be done, depending on the type of foam you have) and use that to encircle the rim of the shield. Tape it down on the ends of the foam lengths, and probably once on the middle or at 1/3 marks.

Depending on how you want to cover your shield and how complicated you're looking to get, there's two different ways I usually finish round shields. You can either:
1: Get a round piece of fabric with a radius of about 9" or so larger then the radius of your shield (play with the values a little before you cut, your preferences may vary), and sew it pack onto itself, making about an 1" circumference tube along the edge. Leave a hole open, and then use an unbent coat hanger to feed elastic through the tube. Put it over your shield like a seat cover and pull it kind of tight (so that you can get it back on and off, but not so loose that it doesn't want to stay). Sew the elastic down, cut off the excess, and you're done with your cover. Put the arm/hand straps on, put the cover on, and you're done.
2: Make what amounts to a pillow case for your shield: Put the shield on top of the fabric and fold the fabric over like the shield is the meat of a taco. Pin the shield in, then give yourself a few extra inches around and mark a circle on the fabric with chalk. Also mark where your strap holes are (on only one side) with the chalk (this will now be the inside-side of the shield, so make sure you do it for the correct hand, this matters less for a round shield if you're putting your arm along the diameter). Take as many pins as you need to out to remove the shield, then cut along your chalk lines. Sew where the pins are with your machine. Flip the case inside out so the seam is inside, put the straps through your shield (but don't make them into loops yet!), put the shield into the cover, and feed the ends through the holes in the cover you made. Now make the belts into loops. Hand sew the remaining edge of the cover with a whip stitch and you're done.

The first method is great if you want to be able to make multiple covers and make repairs to the shield easier. The second way is better if you want to make a cover that has a bunch of stuff on the back that you can access quickly in combat (but takes way more work on the creation stage that I didn't go into).

Paint your shield with fabric paint (not puff-paint). Acrylic will work for a little while, but will flake off, so make sure you use fabric paint.

~Matt
 
Thanks BTW for that. I'm currently trying to make mine.

But, I have another question, is there a chart for armor? Such as how much armor per area I'll get for whatever material?
 
Yes (kinda). The guidelines for armor are on p.77 of your book.
Basically, you'll receive either 0, 1, 2, or 3 points in up to 8 locations, 4 of which count double (head, belly, back, chest).
The points you will be awarded are based on what the material is/how thick it is/placement of rings/studs/etc.
 
So if I make a chain mail made from pop tabs I would get?
Also does knit cloth count as somethin'? (Under wear for iron man events.)
 
for cloth, you might be able to get 2 points for being "In Genre" if it's an appropriate costume.

As for non-standard chain mail, you could get one point per location, you could get two. It depends on construction and the marshal evaluation.
 
Back
Top